Tuesday, 12 September 2017

Black and Orange Paisley Print Midi Dress

Autumn sunset colours and another dress, this time in a flowing midi length 1970's style.  This is a super-sized paisley print in black, cream, grey, oranges and pinks.   


Its a burdastyle pattern (for either a maxi or midi length dress) from the June 2016 edition.  I had intended to do the full maxi at first, but due to limited fabric I had to cut the length shorter. I'm very happy with the midi length actually and as my summer tanned legs will rapidly fade back to the colour of skimmed milk by October, I'm making them most keeping just a few inches of lower calf on show for now.  It's a great length to wear with boots too, making it perfect for going into the chillier months.  


The design has a very flattering inset godet panel at the front that flares out from the waistline, and the shaped bodice flows down into quite a full skirt.  The skirt sides and back are cut on the bias.  There is a sewn-in band around the waist on either side of the godet that ties at the back.  I have to say the shaping is great and the fit very flattering for me.  I cut a size 14, which came out pretty spot on as a UK size 12.


I love coral colours of this material and I like a bold print occasionally, and so when I spotted this crazy paisley fabric for £3 per meter a while ago it just had to be mine.  It was just waiting for the right pattern to suit it.  I have no idea what the content is (man made fibres to be sure) but it's quite a weighty fabric and slightly stretchy with a really good drape and flow to it.  Hell to cut out and keep still enough to sew, but beautiful to wear.  

The sleeves are very full and flippy, making a great top shape in contrast to the plunging neckline at the back and front. I love the deep double V neck on this, but you might need to adjust according to your comfort zone before cutting the bodice out.  I'd recommend a couple of bra strap loops to keep things in place on the shoulders too, especially if the fabric is a bit weighty.


Cutting the pieces was a challenge with this pattern repeat as I really didn't want any obvious repeats cropping up in odd places, and neither did I want to miss any opportunities for a nice placement.  I was particularly careful with the front godet, which I cut carefully and then placed and pinned.  It wriggled horribly on the machine, with seemingly acres of heavy slippery fabric that was hell-bent on pulling away from me.  Inevitably this ended up with the print being way off kilter and the whole thing had to be unpicked and re-set in.  Bleurgh!  I made sure I basted it in the next time so it was held securely.  


I was short of fabric to properly deal with the design repeat, so that I was winging it for the most part actually and just needed to squeeze every piece out as best I could.  Luckily the print is large and quite random, so the repeat isn't clearly visible.  This fabric has a bouncy texture which just wouldn't submit to ironing at all and in fact the finish on the hems is just a very close zig zag along the raw edge, no turning under as it wouldn't lay flat. I usually prefer cotton, linen and wool mixes to work with as they are much less likely to have a mind of their own and are well behaved on the machine and under the iron.  The upside is though, it doesn't tend to crease, so although it's refusal to iron means some of the seams are not as flat as I'd like, the benefit is it won't crumple easily on wearing.  And less ironing of clothes generally is bonus all round.


I have omitted the full lining on this dress, and I'm very happy for it to be without one.  I would usually line most dresses as the fit is usually much better and skims over the body with less creeping or bunching fabric.  Lining also stops you being caught showing all you've got, when the sun shines right through the fabric and you realise your dress is more transparent than you thought!   


However this fabric is very opaque and so slinky-malinky that I just felt the skirt lining would only add unnecessary bulk.  The bold pattern prevents any of the lighter coloured areas revealing what lies beneath.  I experimented a bit with a facing to finish the neckline and in the end opted for a bodice lining only, using a dark grey cotton poplin.  This makes the top section comfortable and stable around the neck, but doesn't constrict the movement of the dress.  I really like flippin' those sleeves around!


And so it was off to its debut outing for a garden party on Saturday, with a gang I haven't seen for most of the summer.  What with school holidays, work and kids to juggle and a couple of weeks in France I don't seem to have had a chance to hand out with friends for quite a while.  Of course if you combine a group of the most fun and fabulous ladies I know with prosecco on tap and professional entertainment, it was a hilarious and very late night. Apologies to all of my lovely friend's neighbours for having to listen to me belting out Don Henley 'Boys of Summer' at the top of my voice and non-too tunefully at 2am in the garden. In my defence, the wonderful guitarist who had previously been playing had left a unguarded mic outside in plain view and the results were inevitable I'm afraid.  Anyway, a fantastic last summer fling was had by all and so onwards into Autumn!


Friday, 1 September 2017

Burdastyle Dress for France

Pinch and a Punch!  First of the Month!  It's September and the beginning of autumn days and probably, possibly, quite likely my favourite time of year.  I love summer too of course and have just been fortunate enough to have nearly two weeks in Jura, France for my holidays this year, which was amazing.  But then I came home to red apples on the trees in my garden, pounds of fruit and veg on my allotment and crisp blue skies in the morning against which my giant sunflowers are beaming and I completely love it.

A few weeks ago I made this dress to take away with me to France.  It's a burdastyle pattern from last year in the June (2016) edition.  


This is me standing near the fountain in Champignole, which was the nearest little town to where we were staying.  Blending seamlessly with the stonework. (The grey linen and leather cross body bag behind me on the floor is also made my me, and is a couple of years old now, but still going strong!). The fabric I chose is a mid weight cotton print that looks a little like camouflage but has a floral design in calm, neutral shades. 

The neckline is quite high, but with cutaway shoulders it makes quite a nice outline I think.  


I'm already familiar with constructing the neckline as I have made a couple of tops with this lapped shoulder from the same pattern sheet.  This is the version from the magazine, and you can just make out the line drawing shape below.  On closer inspection, you can see the dress has a couple of nice design features, despite being quite a simple shape.  There are two inset panels that angle down at the front, which tend to disappear into the print somewhat, but make a nice additional detail.  


This is the first time I have cut and sewn a proper mitred edge on a panel like this and I really enjoyed this little technique.  They insert into the dress at the front of the arm hole and extend downwards and forwards, returning back into the side seam.  To construct them  you are beginning with pieces that look like this.


You then pin one longer one, over the other shorter one and and sew the end together...


Turn it out so that you have a nice neat pointy bit and here you can see I've also marked the centre fold line with stitching.  So when you fold on this line - voila!


A beautifully turned, perfectly mitred corner.  This then fits along the shaped side seams of the dress.  I found this very satisfying to do and if you like to have a bit more help with each step (as I do, although I'm just about able now to follow burdastyle's leaner instruction format in this regard) you'll be pleased to know that this dress is featured in the 'sewing course' in the magazine so there is a fair bit of detail in the instructions and more pictures for you to follow. A solid colour fabric would show all the lovely sharp panel corners off more I think.  But I know they're there!  Here is a dress form picture or two.


Always great to have pockets in a dress, they are in the side seams here.  The back has an invisible zip (not quite as invisible as I'd hoped for actually, I did use a normal zipper foot to put this one in and although I usually find it ok without a special foot, this time I didn't manage to get quite as close to the teeth as I thought).  I used a hook and eye at the top to close the neck band.


This dress was great for the couple of days we visited local towns and once on a trip to the local market, but actually the rest of the holiday was spent in various combinations of swimwear and cut off denim shorts and tees.  Half of the suitcase remained unpacked as we were mostly just swimming in the wonderful turquoise lake nearby and hanging around our chalet relaxing or playing badminton.  Or eating cheese.  Or drinking wine.  This was the lake we swam in every day, surrounded by forest and completely magical.  That colour!


Looking stylish really didn't feature an awful lot, which was very refreshing actually.  Although I'm loving being back and having my full wardrobe to choose from again.

I did find this one perfect outfit accessory though.  This little vintage beauty was one of four, all the same country cream colour (with more than a hint of rust) and all of them gently crumbling away in a local farmyard.  It would have gone with my dress perfectly I think, and I'm pretty sure they wouldn't have missed just one of them if we'd towed it home.


Back to the indian summer sun and sunflowers here in England now though and ready for a new season's style.  Hope you had a fabulous summer too.


Saturday, 8 July 2017

Navy and White Striped Shirt Dress

I love cool graphic stripes for summer.  Stripes are fun.  Stripes make me smile and they can cut a dash without being cute.  Stripes are also great to pair with colour, or plain, or pattern, or anything really.  Stripes play nicely with all sorts of other things in your wardrobe and even if they clash a bit, they do it with a certain style.


This bold navy version is an eye catching width but a lot easier to wear than you might think, as long as they are in two contrast colours.  Too many more colours in the mix and you might stray into children's television presenter territory (cheerful and fun, but not necessarily the look I'm going for here), or worse, television intermission card (yikes!).  Hopefully this bi-coloured bandwidth comes across a little smarter.


You can see from the back view that there is really no shaping at all in the dress cut, with a single back pattern piece cut on the fold and no darts front or back.  The tie belt pulls the overall rectangle in a little and gives a waist.  Made in a crisp cotton poplin, the fabric is cheap and cheerful too, as well as being completely washing machine proof and with just enough body to retain a bit of backbone.  I got this fabric for just £2.95 per meter and the dress took up around 3 meters in length, which when basic buttons were added made the whole thing come in at around £12.00. This poplin is widely available and comes in a many colours.

The shirt dress is a pattern hack from the Thread Count wardrobe builder pattern that came free with a sewing 'zine back in May. A loose, unfitted shape, this can be used as a good basic pattern to play around with and it has nice deep pockets in each side seam.  I would have liked to experiment a bit and perhaps cut one of the front sections with the stripes going across, but I didn't have enough fabric left to piece it together properly. The original pattern has a full length sleeve with cuffs, which I dispensed with straight away as I wanted a short sleeved summer dress.


By lopping off the lower half of the sleeve pattern pieces and making a very basic turn up around the hem, the sleeve shape needed no redesigning really at all, although I wanted to add a bit of detail here and had the idea of a tab to give more shape to the upper arm.  After sewing the tab to the underneath of the hem, I turned the tab to the outside and then finished with a row of top stitching to hold it in place.  


By adding a button to the shoulder seam line, sewing it to the seam allowance inside for stability, I can ruche the sleeve up.  Alternatively it works let all the way down too, with another smaller button securing the tab mid-way down the sleeve.


If worn this way, the sleeve hem sits just above the elbow and looks bit more relaxed.  


I do rather like the wide belt tied in a large, crisp bow as I think it looks eye catching with stripes against stripes, however you could just as easily tie a simple loop or knot, or even add a couple of belt rings for a simple belt fastening and a more dressed down finish.  This particular fabric holds its shape well too, so the wings of the bow stay nice and proud.

When the above shots were taken I was about to take this dress on its first outing to a friend's birthday drinks and dinner so I'd amped up the accessories a bit.  The shoes are M&S from about 3 years ago, in eye watering orange suede and I added a pair of perspex earrings in dayglo colours.  


But I also took this dress with me on a recent trip to Documenta festival in Germany and was so, so glad of it!  In 30 degree heat whilst walking around the city for 10 hours each day this could be dressed down beautifully with flats and kept me unflustered in the humidity.  


This is me, enjoying the fresher evening air after wearing this dress all day long in boiling temperatures, visiting various sites around the busy city.  I think it still looks pretty good considering I had really put it to the test. 

I'm standing here in front of the Parthenon of Books by artist Marta Minujin at Friedrichplatz in Kassel. This is a huge installation, a replica of the ancient Parthenon in Athens, recreated with a scaffolding frame and covered in thousands of books encased in clear plastic wrap.  During the day, the books have a mosaic appearance, full of colour and sparkle covering this replica building on a vast scale. At night it is silver and ghostly, lit from within like a futuristic visitor spaceship from another planet.  On 19th May 1933 the Nazis burned over 2000 books on this site, in the so called 'Campaign against the un-German spirit'.  In 1941, during allied bombing, Kassel's library on this site was destroyed and 350,000 books were lost.  This installation stands in tribute to banned books, censored writing and these historic events destroying literature either symbolically or as a casualty in the theatre of war.  It will then be dismantled and returned to the public with the books distributed once again into circulation.  

Documenta 2017 festival in Kassel brings together some of the world's most celebrated artists in a city-wide festival of work that provokes and inspires in equal measure. Complemented with some excellent German bier, of course.  Cheers!


Tuesday, 27 June 2017

Yellow Culottes and Sunshine

So it's been hot these last few days, time for some proper summer work clothes.  These are hands down, one hundred percent, no contest the most favourite item in my spring wardrobe just now.  Yellow culottes.  Totally indispensable and I can't imagine having ever lived without a pair.  Also, you know when you get something new and it just goes magically with loads of other stuff you already have and revitalises umpteen new outfits?  Well these are that thing. 


Here they are with a long sleeved breton top.  And again with a striped wrap blouse and blazer. Mix, match and mix again.


Here we are with a cropped top and leather jacket. In fact I knew this was going to be the case before I'd even finished them.  As I tried them on with pins still in the waistband and no fastenings or finished hem, I had this 'yes!' moment.  And, because I'm impatient and wanted them to move straight from the sewing machine to being on my actual person instantly, I was in a mad rush to finish hemming and button sewing.  


So much so, that I was still sewing on the back button at the same time as feeding the small persons in the family their breakfast and getting ready to catch a train for meetings.  Small wonder then, that as soon as I sat down on said train, the button popped off!  I spend the rest of the day praying the zip was sturdy enough to keep my lovely culottes from submitting to gravity and heading to the floor.  I also resolved to finish things properly before I skip off to a meeting two hours away from home.  Or take a portable sewing kit with me for on the move repairs.  


The pattern is Butterick B6178 and was free with last months Love Sewing mag and it really is so easy I managed to throw them together in a few hours (throw being the word here, see above reference to them falling apart!) and there are very few pattern pieces to cut.  The shape is flattering being high cut with a wide waistband and no fuss around the front or rear except for a couple of shaping darts (there are other versions on the same pattern pack for a more pleated pair for extra volume).  Here they are on Friday with a  scoop neck powder blue tee shirt and a little vintage jacket.  The jacket is a Louis Feraud picked up in a charity shop a couple of years ago, I love the cornflower blue colour with this butter yellow.


I did make a couple of minor changes to the pattern recommendations, one being replacing the hook and eye closure with a button and loop.  I just didn't happen to have a suitable hook and eye about the place and I don't mind the extra detail of a back button closure here.

The only thing I would consider changing in the future with this particular design is the back zip closure.   I think an invisible zip would look much neater and although I'm happy to wear this version, as the pattern described a basic zip technique, I would always usually do an invisible zip or a completely exposed one.  As it happened these culottes were a quick weekend make using stash fabric and a zip I already had lying around, which is fine as a 'wearable toile, as they owe me nothing. 


But that colour!  Pale sunshine, mustard or maybe butter yellow.  The colour is slightly brighter than the photos here show, my phone camera has washed out the colour as the sunshine was beaming so brightly in the garden last week.  The fabric is actually some mystery viscose type that has been languishing in my stash for about 10 years and was given to me by someone who probably had it for quite a while before that even.  It's practically vintage.  I did wash it first, so hopefully sorted out any potential shrinkage or colour run, and it behaved beautifully when being cut and sewn up.  It does fray madly though, so I did have to be careful how much I handled it before finishing the edges.  


And so off they went around the country for three days in their first week after being made as I practically refused to take them off.   That's why they are looking a bit creased in this photo, which was taken after I returned from a whole day wearing them at work. This weekend they were wheeled out again but dressed down with a black swing vest top and flip flops.  I can see them with khaki, white, even sugar pink would be clashy but totally doable. 


So for a quick make and a fun relaxed spring garment, on duty and off duty, these are the business.  


Saturday, 3 June 2017

Customising and Embellishing - Ribbons and Pom Poms and Studs Oh My!

A couple of weeks ago I spend a few days away on an early summer getaway to Mallorca and had an amazing time exploring beautiful Alcudia.  We stayed in a lovely spa hotel, overlooking beautiful Alcudia Port and enjoyed three days of gorgeous sunshine, delicious food and total relaxation. 


I only took hand luggage with me and if you read my last post here you can see what I made to take along.  It occurred to me though, when I was considering what other essentials to pack, that there are plenty of ways to take a few simple holiday bits and bobs and customise them to make them unique and truly your own.  I like to mix up hand-sewn items with high street  or thrift items generally and I also like to combine them, by embellishing or altering ready made garments to create a bit more interest.  Or I like taking inspiration from something I've seen someone else wear, or in a shop, and then improvise creating my own version.

I thought I'd show you a couple of customised pieces that I spent a few happy hours stitching, gluing and embellishing, specifically to go with my holiday outfits.


Firstly a very quick fix and a look that is currently very popular, an embroidered patch for my old denim shorts.  For me cut off denim shorts are an absolute summer basic and despite their humble appearance, this particular pair are about as customised as they get!  They were once favourite jeans, which after being downgraded from everyday wear to allotment attire, became so dishevelled they didn't even pass the deliberately 'worn in' look and just became downright unsightly.  I cut them off, stitched the seam rips along the (ahem) crotch area (I'm blaming that barbed wire fence that looked lower than it actually turned out to be!) and then when the zip eventually broke I unpicked and replaced it.  So far so customised.  

For this season's brand new look for these old bruisers, I added an embroidered heart to the back pocket.  This is just cotton embroidery thread, some cord and the whole thing has a denim backing that I've then hand applied with slip stitching to the shorts.  Much love to you my old amigos, I will get another season out of you yet.


Next I specifically wanted some shoes to go with a particular outfit for evening.  They needed to be black, not too high for strolling into the local town or down to the beach bar, but with a bit of interest.  Getting black strappy sandals with a mid heel and a bit of pizazz about them is a challenge this season apparently (limited black sandals to be found anywhere) and on a strict budget proved nigh on impossible.  So with a plan in my head (plans are always brilliant when they're in my mind's eye) here is what I purchased instead.. ... 

Basic sandals, some black grosgrain ribbon, pom poms and some mini-pom trim.  The piece of black leather is from my stash, but I could have bought a small piece of fake pleather very cheaply if needed.


I had a vision, inspired by some rather expensive high-end high street beauties, that pom-poms and leather tassels would take these rather workaday sandals up a step from 'meh' to 'ooh la la'.  Here's what I did.  

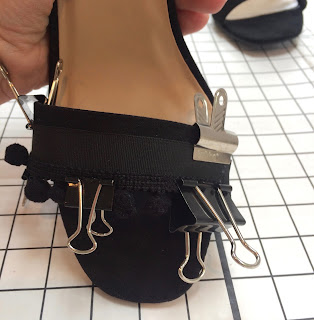
The mini-pom trim was first machine stitched onto the grosgrain along one edge of the ribbon and then each ribbon section cut to slightly longer than the sandal toe-strap.  I turned each cut edge under and stitched across.  This was applied to the toe strap with fabric glue - I used the type of glue that will bond securely to leather.  Then apply stationery to secure.


Once this was in place I used three larger pom poms on the top edge of the ribbon, glueing them in place and used more mini-pom trim across the ankle strap, using fray stop on either end to make sure no stray threads were going to unravel.  I used the fabric glue to apply it to the strap.  You have to use a bit of testing here to make sure your little mini poms can go all the way up to the buckle, but won't get snagged in the fastening itself when you put the shoes on.  You have to bear in mind the ankle strap needs to go through the buckle and you don't want to be hauling those cute little poms through there when you're trying to take your shoes off at the end of the night!  I tried them on to see which buckle hole I need to use, and trimmed off a couple of poms accordingly. Everything needed to be held together securely for the glue to bind properly, and so my shoes ended up bristling with more bulldog clips and, when I'd run out of those, wooden clothes pegs.


Lastly I made a leather tassel, in the same way I've shown on on the blog previously.  Those of you who look at my instagram will know how much I like a tassel and having already be-tasseled everything from key rings to my ears, it was only a matter of time before my footwear were to receive the same treatment.


This was looped over the buckle at the side and the tassel is large enough for a statement, but not long enough to drag along the ground.  Done!  Fabulous one-off footwear for an absolute fraction of the cost of a designer purchase.  Boom!  I could of course happily begin with sandals in a bright colour, and apply more coloured trim for a really funky pair.  The world is your pom pom.


Safe to say I got the bug after bedecking these specimens and couldn't resist having a go at another pair of shoes, but something for everyday.  In this case I found a simple and cheap pair of denim pool slides, perfectly functional and I'd have been happy to wear them just as they were actually.  But I thought, how much more fabulous to Gucci them up a little?!  In this case, the inspiration came from Gucci's recent collection of sandals and wedges boasting pearls, studs and rope embellishments (which for the real deal would go north of £650).  Here are my slides, before and after their treatment.  


I added red rope, red sequins, gold studs and seed pearl trim by stitching each strip in a band along the denim.  The great thing about fabric shoes is you can stitch anything you like to them.  I could have used patches, embroidery, even machine stitching on these.  I used a tiny bit of fray stop on the edge of the rope, to stop the strands parting company and then used hand stitches to secure it firmly at either end and along its length.  These studs are amazing, purchased from the wonderful 'Kleins' in Soho, London.  They come in a wide band and you can just cut them in strips however you like.  These are antique gold and have a fabulously detailed, textured surface.


The seed pearls are on a secure strand and so are easy to apply with stitches in between every other bead.  These little slides were just brilliant on holiday and happily took me from poolside to beach and then from bar to dinner.


There is a slightly addictive quality to customising though, which I think comes from the sheer speed at which you can change the look of things and get a satisfying result.  It's definitely much quicker than making from scratch and you can apply a bit of personality to any garment, shoes, bag or other accessories.  However I think the less is more approach pays off here and having one or two embellished items at a time is plenty.  Lest I risk looking as though I've been dipped in fabric glue and thrown in the bargain bin at V V Reuleaux.  Having said that, I can think of worse fates for a custom-addict. 


Wednesday, 17 May 2017

Sewing for Sunshine - A May Mallorca Getaway

I was lucky enough to have a quick getaway to Alcudia in Mallorca last weekend for a flying birthday-treat visit, with two fabulous friends.  Perfect bliss!  


And of course I couldn't leave without packing a couple of new makes to wear.  26 degrees, turquoise seas and pearly white Balearic beaches gave me the perfect opportunity to indulge in sewing up a couple of cool summer garments, even before the temperature gauge has reached double figures in the UK.  Summer wardrobe staples, hot off the machine, and I am ahead of the game.

For the last couple of weeks though I've been pretty focused on getting my work finished before taking a couple of days away, so I needed patterns that were tried and tested, that I could whip up with minimum fuss and in double quick time over a couple of evenings.  For example, I already know that the blue Bardot style top from Cynthia Rowley doesn't require any fitting as it's a very loose style, and having solved the wayward neckline issue a couple of weeks ago (see that post here for how, which I am still very chuffed about) I felt another one of these would fit the bill for a cool and floaty top.  This crisp cotton was already in my fabric stash and its coastal blue and white anchor print was just calling out for a beach themed garment.


Yes I know it's a bit 'coals to Newcastle' taking a nautical print to a seaside port, but I think it's really fresh and fun looking.  And I love the way I can have the sleeves on this either longer or shove them upwards for a poofy, shorter look. Is there a technical word for that sort of sleeve?


Now, the blue top that I already made from this pattern is purposely swingy and has a lot of volume going on.  It's great with skimpy shorts or some sort of tapered bottom half, but I had the idea of creating some means of reining a little of that excess in for this new version.  I thought about creating another channel for elastic at the waist, or at the hemline for a cocoon shape, but after a bit of experimentation I came up with this.


The two very small loops inserted at each side seam at the waist, accommodate a length of cotton tape, which when pulled in at the back, creates gathers that fold inwards.  From the front it looks a little slenderer and creates a bit of interest at the back. Ideally I would have used white or navy grosgrain ribbon for this waist tie, or even introduced a colour (yellow?) but I used this white tape from my stash as there was no time to shop for bespoke notions pre-flight!

The next garment to hit the machine was a pair of shorts to compliment the top.  This blue cotton, on the right of the anchor print, is very like lightweight denim, with an interesting finish on one side that appears exactly like the reflections of light on water.  The back of the fabric is solid blue.  


It was a scrap I salvaged, along with some other miscellaneous pieces, from a pile of cloth remnants left in a box outside a house on my street.  The box had a notice on the front offering the material to anyone who wanted it, with a request that any donations posted through the letterbox in return, would be directed to the local cats home!  I love fabric bargains, and I quite like cats, so double happiness right there.

There was just enough of this fabric for a pair of shorts and the pattern is taken from one that I have re-used many times before and has become a bit of a wardrobe staple for me.  Simplicity 1430.  None of these designs are going to set the world of sewing on fire, but actually I have made quite a few of each of the tops, trousers and shorts and they have been reliable bread-and-butter basics.


These shorts are a really flattering cut, with front pockets, a neat fly, a wide waistband and double button closure.  I've tweaked the pattern in the past so I know it is tried and true.  I also know that I can make these out of fabric fumes if I am running on only remnants, using contrasting fabric for the inside waistband and pocket yokes if necessary.  In this case, there was just enough blue cloth to complete the whole thing.


The great bonus about both of these makes, apart from the fact they go perfectly together and with lots of other things, is that they are so soft they pack away to nothing.


Obviously this means lots of room to pack a TON of other clothes into my carry-on case that I just didn't need and didn't wear at all!  Never mind.  Part of the fun of holiday packing for me is second guessing every possible eventuality that might occur and making sure I have it covered.  Minimalist I am not.  I can vacuum pack 27 outfits into Ryanair size-conforming hand luggage with a selection of shoes to match, and still have room for souvenirs on the way back.  

Also included in the flight bag for evenings that I must mention, was this top, made last year and again from charity shop remnants.  


I made this from a scrap of beautiful silk-satin moire found in a trunk of old linens, along with some black lace and black grosgrain ribbon.  I love this Burda bustier top pattern, even though it is very cropped (and my abs have unfortunately taken early retirement).  I haven't worn it very much here in the UK for that reason (I can perform a reasonably impressive 'plank' if forced to, which would suggest I do have some core muscles somewhere within, but lord knows where).  I added a little more coverage at the waist using black lace along the bottom hem and paired it here with a high waisted black skirt with a wide waistband, found at New Look.  This gives the whole look the desired cropped-top effect combined with a comfortable amount of coverage.  


I couldn't resist making up some tassel earrings in black leather to go with this too.  Ready for cocktail o'clock and a couple of Moscow Mules, beach-side.


And so a fabulous three days in Alcudia, Mallorca was had by all and my Vitamin D levels have had a much needed boost.  I'll be hanging on to these memories as long as I can.