So let's go back to where they were in the wardrobe hierarchy until this week. I have about 5 pairs of leather trousers currently and wear about 3 of those regularly. I consider them to be key garments for me and I love wearing them. This is one pair though, that I've only ever worn out a couple of times but they've never really inspired much love until now. They were given to me a few years ago by a colleague, who kindly brought them in to see if I wanted them as she 'knew I was into fashion'. She told me she'd bought them many years ago from a boutique while on holiday in Italy and then never wore them, but as they'd been so expensive she hadn't wanted to get rid of them either. All the tags and labels were still attached and they'd been carefully wrapped in tissue paper. Such a shame that she didn't feel they were really 'her' after having unwisely bought them on a whim (I've soooo been there!) but what a windfall for me. The only slight problem was that they reflect a very distinctive style of a late 80's era that doesn't really translate well now, both on my body shape and in relation to my wardrobe. So after residing unworn in her wardrobe for years, they now had a new home residing unworn in mine.
Having had a good look at them, they had a few good points, as follows:
Soft, supple and look like new
Fully lined
High, cinched waist that fits me perfectly
Reasonably well fitted around the rear and crotch, (although on the generous side it's an acceptable amount of ease in relation to their style)
Interesting, relaxed cut that potentially takes them up a notch from plain leather jeans to a more stylish level
Here's what the top looks like inside out so you can see the construction. Nicely lined and a soft fitted waistband. This really is the business end of a pair of trousers and would be an extremely difficult part of the garment to refit, if not impossible without leaving alteration marks. So the fact that this area fitted well was a huge incentive to have a go at sorting out the rest of them.

They also had a few issues, which were:
Too long in the leg
No pockets - WHAT?!?
Extremely wide in the hip and thigh area
Wide along the length of the leg, which then narrower where the ankle should be... on a taller person
Wide.... just very, very wide.
Not flattering generally... bleurgh
There was a distinctive 1980's vibe about them in the high, pinched waist, the generous cut and narrower ankle, which I sort of like. However they are creeping slightly over into MC Hammer or 'muscle pants' territory and that is what is putting me off wearing them. It's basically just not a flattering look on my frame and makes me look like a short person wearing a tall person's clothes. I just don't have enough actual leg length to pull this amount of fabric off.
I decided to bite the bullet and alter them so that the fit is better, whilst trying to keep the basic design elements present. Having done a bit of leather sewing last year altering the charity shop leather skirt and then this year doing the leather inserts on my bomber jacket, I've gained confidence in working with this material and also some tips and techniques that would hopefully stand me in good stead. The shot below shows how the trousers go from narrow at the waist to balloon-like over the hips.

A major irritation with these leather pants is I really, really want pockets. It just feels very wrong to me, having relaxed slouchy trousers and nowhere to shove my hands while standing around, er... relaxing. Basic error here surely. So this is how I went about altering these louche leather lovelies.

I started by unpicking the side seams all the way to around one inch below the waistband where the pocket opening would roughly start. I used scissors and just cut through the lining material rather than unpicking it, as it was much quicker than unpicking the stitches and I knew there wouldn't be a shortage of seam allowance here. You can just see in the photo above, under my finger where the sides at the top near the waistband, the seam edges have been reinforced with tape, so it's odd that no pockets were then added here.
Trying them on inside out, I roughly held the edges of the seams together where I wanted to lose some width and marked the new line roughly with white tailors chalk onto the reverse side. When I was happy with that, I carefully marked the new line for sewing the seam with tailors chalk so that I could follow it exactly. I marked the seam at one extra inch from the the hips and gradually took this to two inches further in towards the lower leg. I was tempted to take in more, but these are supposed to be a baggy style and not skinnies or straight leg, so I resisted the temptation to pull them in further. I used the new chalked line to guide me and carefully cut outside of this line so that some BUT NOT ALL (important) of the excess width was taken away. It is crucial at this stage when cutting a bit blind that you are very conservative in your estimation of how much to lose! Better to cut a little at a time, check t e fit and the look, and then adjust again in increments. Rather than find you've merrily lopped off such a massive chunk that you now have nowhere to go. I have also learned this the hard way from cutting my children's fringes. Telling the school that your child is channelling a Paul Weller circa 2015 style fringe is fine for a few weeks, but unlike hair your leather trousers won't grow back!
Turning them the right way round again and trying them on, I could now use small bulldog clips (what I had to hand at the time, there's probably a better way of doing this bit isn't there? Do comment if you know of one!) to roughly hold them together and check the shape was looking ok from both the back and front views. As you will know, pinning isn't really an option here as the pins will permanently make holes in the leather and so really doesn't allow you to adjust along the way. The nipped in ankles needed to be wide enough to fit my foot through without stressing the leather, but narrow enough to look styled and not just hanging there, so that needed double checking too.

I took the pocket liner shape from a trouser pattern I have already used, cut from some black lightweight polyester lining, and attached them to the side seams after checking where on the hips they should sit. Sewing them together and finishing the edges was done in the usual way. You can see from the shot above that the completed pocket area does pooch out a little on either wide when I move around, but I'm not too worried about this.

I topstitched the pocket line at the front edge so that they sit nicely in place.
Then the bottom hem - a couple of options presented themselves here. I could have cut it to the length I wanted and just left it as a raw edge. I could also have turned up the hem and either glued or sewed it in place. In the end I decided to trim down a little of the length to get rid of most of the excessive crumpled look around the bottom and improve the way it hung, then turned under a little and added a dab of fabric glue. If for any reason I want to rip the hemline open again and change the length, I can and there will be hopefully no marks on the leather.

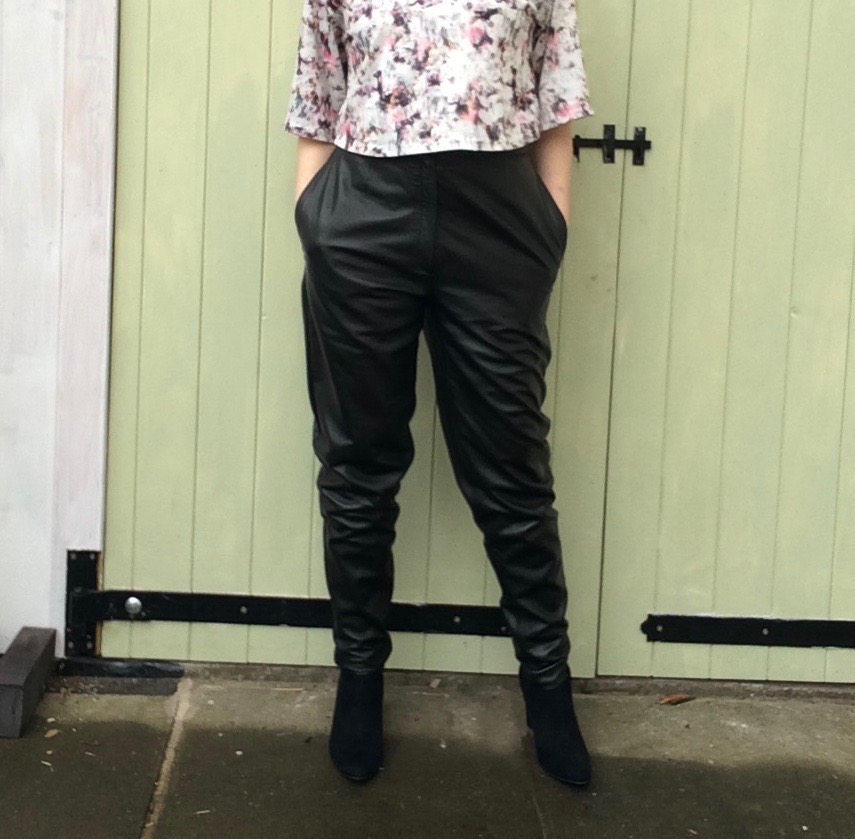
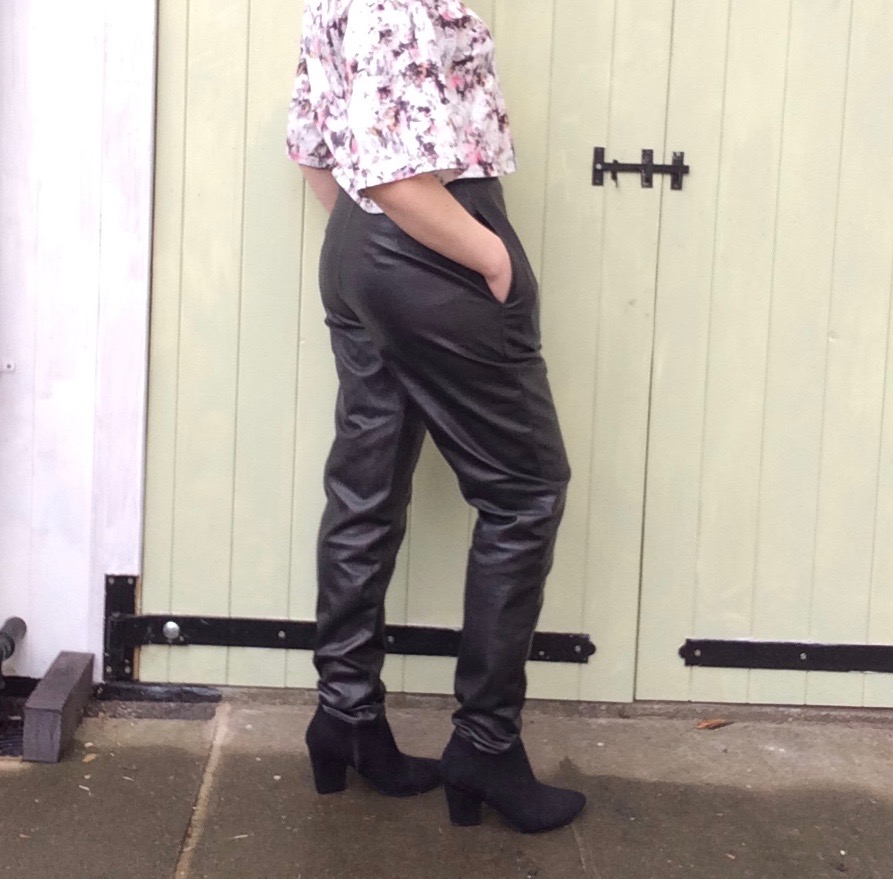
All in all I'm very happy with these now and love having a pair of leather trousers that aren't just a variation of a skinny or straight jeans cut. They're also really comfy to wear, look styled when actually I've just chucked them on with a t-shirt, and look completely different to anything I've seen available on the high street just now.

I've worn them here with a cropped top from New Look (an old purchase from around two years ago) and a pair of ankle boots from Primark. For work I'd probably dress these up a little with strappy heels and lovely silk shirt or t-shirt with lots of drape, tucked in to show off the high waist. After spending so much time sidelined, I'm so pleased these lovelies are back in circulation. Back in the game!
Congratulations on resurrecting these, you'll get an extra kick out of wearing them knowing you've brought them back to life! Altering a ready made garment is such a good way to see how it was constructed originally and pick up tips for future sewing projects. Bulldog clips are good for holding leather together; paper clips can be useful too, but make sure you only use them on the wrong side of the leather to avoid them making marks on the right side.
ReplyDeleteThank you AWR! I love bringing things back into use again, whether its clothes or furniture or anything else. Good tip about using clips on the wrong side to avoid marks. I used them in the seam allowance only too. Sarah
ReplyDelete