Tuesday, 29 March 2016

Easter Project, Black on Blue, Colour Block Tunic

Happy Easter everyone!  This bank holiday started on an absolute high here in the midlands with warm spring sunshine, endless blue skies and positively balmy temperatures.  Friday was spent soaking up the sunshine outdoors all day and what a lovely feeling to come home at dusk with that distinctive warm glow on my cheeks - the kind of glow that comes from actual warm sun and fresh air that is, not wind-burn or frostbite.

We won't dwell on the weather over the rest of the weekend, suffice to say it was perfect conditions for sewing indoors, with the heating on, a new 'Love Sewing' magazine and mucho vino and chocolate to help things along.  And so, thus fuelled, I made this royal blue, black and navy blocked tunic top from the free pattern included in this months LS mag.  


The pattern is for a colour block tunic or dress which has a v-shaped cut away at both the neck and sleeves and a zip at the back.  The front and back yoke and arms can be changed around with pattern or colours and, because I'm wearing a lot of blue and black together at the moment, I thought I'd put the two colour elements into one top.  I like the longer sleeve option here, as a little arm coverage is keeping the goosebumps at bay.  I nipped outside today during a fleeting sunny spell to take the photographs and five minutes after coming inside it was nailing down hailstones!  


The front bodice section and arms are cut from quite a bright royal blue cotton and I've overlaid this colour with black, cut away fabric (t's like black starry shaped lace only with a slightly more weight) so that you can see the contrasting colour through the black cut-outs.  I just used the double layer as though it was one piece of fabric through the whole construction process, keeping the raw seam edges aligned and piecing together exactly as the instructions described. 


The back yoke is the same royal blue at the top and and a dark navy at the bottom.  The pattern called for a concealed zip at the back, but I've chosen to use this black zip and have kept it exposed to bring some black around to the back of the garment, echoing the black lace at the front.  


If you're thinking that the trousers and the back of the top look very matchy matchy, you wouldn't be wrong.  They're the same fabric.  I made these trousers last week and used the last scraps of navy cotton for this back bodice section.  I've worn the trousers quite a few times already actually, they've been a good investment make.

I've also used the navy for the sleeve facings inside, which you can just see when they flip up a little.  I'm considering finishing the inside sleeve hem more neatly actually (i.e. turning it under) so that the raw edges are fully concealed and I can flip up the sleeve edges if I want to and make little contrasting cuffs.  I would certainly consider doing this if I made this top again.


Here are the inside of the sleeves, showing the contrasting facings.  You could do these in a bright colour or print to show them off more if you wanted a brighter flash of contrast.  I've chosen to top stitch along the cuff edge so that they stay put and won't roll back when I'm taking the top on and off.


I cut a size 12 in this pattern, going by the measurements given on the envelope.  I usually cut a size 14 in most of the big commercial patterns and then take in as necessary, but I think this top is pretty spot on in the sizing. Being fitted at the top with two side darts, but then tunic shaped and therefore slightly wider at the bottom, I didn't need to take it in at all.  A 14 would definitely have been too generous.


The pattern omits any instructions on how to finish the back neck, so I simply turned the facing over the zip ends and hand stitched them in place.  A black hook and eye is keeping things minimal here, in keeping with the rest of the garment, but I could have used a button and loop for the closure instead.  A button could easily bring in a contrasting colour and would look cute on a summer floral or print version of this top for example.


So, another wardrobe friendly, easy to wear and practical addition to my hand made wardrobe.  It's also dead easy to make so there may be more of these coming along when I feel inclined to stash-bust.  Be warned though, there is a VERY busy scarf print currently elbowing its way up the project queue!  Studio 63 may not stay in neutrals for much longer.  There is nothing more distracting to me than a geometric print and the one I've got in mind is in sunset colours too, perfect for dreaming of warm summer days and holidays to come.  Sigh!


In the meantime, look at that blue sky!  Taken on Friday afternoon. No filters!  Even my beloved pooch, (who will admittedly launch himself happily through the front door with the velocity of a canon ball in even the worst storms and most biting cold) seemed to be particularly relishing the new and improved weather conditions.  The smiles say it all.

Hope you had a good Easter and managed to catch a glimpse of blue too.


Wednesday, 23 March 2016

Klaxon! The Ankles Are Out! Navy Twill Cropped Trousers

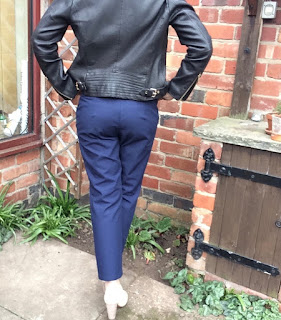
Here are my new trousers, which began life on the cutting table all the way back on Mothers Day intended as a wearable toile.  I had a couple of hours of sewing time 'gifted' to me in the afternoon while dinner was was being prepared for me, which was lovely.  Cue me with glass of wine in hand, scampering off to the studio pronto!  These are made as a prototype pair ready for Spring (pffft! Like, whenever it decides to turn up!).  They are a navy cotton twill, quite a substantial cotton fabric, so thankfully should be able to withstand some low temperatures still while we all wait for less arctic conditions to arrive. 


I wanted a pair of pegged or narrower trousers, slightly above the ankle, ready for sandals or heels, when I can bear to go without socks.  Until then they are happy to partner up with my converse looky-likes.  Only very minimal ankle is exposed to the elements just now and the trainers are earning their keep still.  Although I did brave it today with a rare glimpse of open toes for an equally rare lunch out, as at least the weather is dry and this afternoon temperatures were managing to stagger weakly towards double figures.  Whoohoo!


This dark navy fabric is almost black unless you see it in true daylight.  I'm especially loving grey, navy and black together at the moment and am happily wearing blue and black mixed together willy nilly!  I'm wearing these navy trews with a blue and black striped breton t-shirt and a black leather biker jacket.  


I used to have an old pair of narrow leg navy trousers from H&M that I wore and wore to death, and eventually I caught them when stepping over something sharp in the garden and they ripped at the front.  Sadly they were the sort of trousers that didn't look good in a distressed state and neither were they repairable, so they were chucked.  I've missed them though as they were very easy to pair with neutral shades or equally with spring colours.  I actually love these ones more though as they fit just perfectly.


These trousers are taken from Simplicity 1430, a pattern of coordinating pieces I've had for ages.  I've actually made the top from this set of separates quite a few times, (see examples of a yellow version here and the same in coral here), but this is the first attempt at the trousers.  The pattern described them as being drafted just underneath the waistline, but they didn't look too low waisted.  I've come to dislike a very low cut trouser waistline as it limits what I can wear over the top of it.  I also think a higher waist is a more flattering for me and more comfortable to wear.  This waistband does indeed hit me about an inch under my natural waist, which is just fine.


I usually cut a size 14 in the big name patterns as this ensures a good amount of ease where I need it around the hips and then I take in as necessary, but this pattern only goes up to a size 12. (I think I remember making  mistake and opting for the smaller version when I bought it a few years ago).  I was prepared to let out the seams to the max if necessary, but hoped the relaxed fit would give me a some wriggle room.  In the end I just let out the top couple of inches of seam allowance a bit around the waistline on the trousers as it was a little tight on me.  Similarly I sewed the waistband together with minimal seam allowance to give me an extra half an inch or so.  The rest of the fitting was fine at a straight size 12. When I make these again I'll add the necessary bit of extra ease to the pattern.


So they fit really well overall now and I'm especially pleased with the adjustments I've made, as it always seems to be the waistband that doesn't sit properly when I buy ready-to-wear trousers.  I usually end up having to wear a belt with most trousers.  If they are the right size around the hips and leg the waistband will gape.  Or else if they fit around the waist then the rest of them will be too tight.  The back of these is a flattering fit too (possibly would have been even more so if I'd ironed out those back darts properly!  I was in too much of a rush to wear them out for lunch, food is always my priority).  


I decided to cut the hems so that they hover just above the ankle.  After experimenting with a few lengths, this felt the most comfortable and versatile length to wear just now.  Like I say, the ankles haven't seen much exposure for the last six months, so even though there was a very fleeting ray of sunshine a couple of days ago, we're still taking it slowly and going up one inch at a time in the hem department.


This fly technique was new to me and I really like it.  So neat.  I only had a beige coloured zip in my stash for this toile, but actually it has proved how well concealed the zip is in the end because it is totally invisible when they're on.  It gives a very tidy and flattering, flat front and the wide band at the top is very comfortable to wear.


Double gold buttons at the top!  Bling!


I used black thread for the whole thing, including the button holes and other visible stitching.  Partly this was because this was a toile so I was just using thread I already have lots of in my stash, but also I wanted to test black stitching against the blue fabric.  I think I'd do this again.  


So I finished these off last night and after a quick snip over the loose threads, an even swifter iron (avert your eyes from the back darts if you don't mind) and they served very well indeed for a treat lunch out today.  I even matched the decor at Carluccio's, how very coordinated of me!  We decided a mid week treat was in order as it has been a particularly busy month so far, with Mothers Day followed by two very special birthdays, number one child's first school residential and then family to stay for a week.  Add to that a mountain of work to do, including me travelling away for a few days and a big project launch, and the usual end-of-year admin rush and now we're all careering hell for leather towards Easter.   Hopefully some down time is likely during the Easter break as things have, quite frankly, been a bit bonkers lately.  I love it when there's lots going on though.

So anyway we had a lovely leisurely bite to eat and a chat about how much we were looking forward to the weekend, and then we were aiming for a stroll back through the park.  This quickly turned into me sacking off the stroll and legging it for the warmth of the car - brrrrrrr!  Get a move on Spring, we're all flippin' freezing out here!


Navy twill trousers made by me
Breton t-shirt from Gap
Black leather biker jacket from Reiss
Nude cut away shoes from Clarks
Black fringed bag from Oasis


Thursday, 3 March 2016

Grey and Yellow Cross Body Bag

I love a cross body bag.  Hands free for spinning the many plates we all have to keep going on a day to day basis!  Also they help to prevent me inevitably leaving the bag somewhere while I run after dog/child or when just wandering off in a distracted way.  This is a self drafted pattern that I've used and reused many times before, tweaking the design depending on what fabric I'm using and the sort of look I happen to want at the time.  


Now when I say self drafted, we all know that I actually mean 'draw a square shape then improvise' (which is the method I've used also with some success on clothes in the past).  It really is as simple as that with this bag, just a wide rectangle as a pattern and then everything else is added on and scaled to fit.  The finished bag is roughly the size of an A4 sheet, maybe a bit squarer.  This was not a deliberate measurement, more going by what size fabric remnant I have and what looks like a nice size and shape for a medium cross body bag.  Very technical this.


I started with my scraps of grey and yellow fabric gathered from my stash, after being inspired by the colours of an old bag bought years ago in the sales.  My battered, grey and yellow, pleather shopper from Primark, cheap as chips in the sale (probably cost less than a fiver) has been used constantly for the last couple of springs and summers  Purely because it's lightweight and the colours seem to go with absolutely everything.  So when I fancied a cross body style, spring bag for going out and about at the weekend, these were the colours I looked for.  

Here it is, the poor saggy old battered Primark bag!  A sad sack indeed.


Here's what I started with: A long strip of grey, loose weave linen mix, (that made two approx A4 size bag front and back pieces and then a long strap piece), some yellow cotton for the lining and a piece of leather left over from this skirt.  Gosh the piece I lopped off the bottom of that skirt hem has gone a loooooooong way!  I've only just finished using some other remnants from it on my Houghton jacket for the cuffs and piping.  This very last scrap in the pic below is all that remains.  


I also found a seven inch yellow zip, yellow cotton and decided to include a popper closure (I didn't have a standard magnetic bag closure to hand and as this was a make-on-a-whim project I didn't want the delay of purchasing one specially).  I had originally thought of making the bag both yellow and grey on the outside somehow, but then after fiddling about with layouts I changed my mind and went for all grey on the outside, with a yellow lining.


The piece of leather already has a flat felled seam running down it, so I decided to use this to my advantage and create two pockets by sewing it to the front bag piece, following the existing seam line.  I turned the top of the leather over to hem it and used the yellow thread to topstitch in place, just a little nod to the yellow interior.  The rest of the exterior of the bag was constructed by simply sewing the back and front together along the sides and bottom with right sides together, enclosing all the raw edges, as you would usually do.  I used a leather needle for all of this and in fact didn't bother changing it for the whole project.  You can also at this point cut the excess seam allowance off your bottom corners so that when you turn them there is less bulk.

I wanted to include a zip pocket on the inside too, as a more secure place to stash keys etc.  I cut two identical pocket pieces (again just a rectangle scaled down a few inches to fit inside the bag) from the lining material.  You could use a completely contrasting fabric here for a secret pop of pocket colour!  It's a good idea to put a bit of iron-on interfacing on at least one of these pieces as it helps to give the pocket a bit of structure and stop whatever you've got stashed in there pulling the sides of your bag out of shape.  If you're like me and tend to accumulate a bag full of junk, your inside pockets can easily start to pull away towards the inside of the bag.  From here on, I used the usual method, and there are loads of great tutorials out there on the web for inserting a zip pocket so that it looks like this:


Here is a quick run through: Take one of your pocket pieces (the interfaced one if you have used it) and measure one and half inches down from the top of the pocket and draw a line across, then measure 2 inches down and draw a line across in parallel.  Then measure your zip opening and mark this width (centre it on your pocket piece) on the parallel lines.  You now have a long thin rectangle, or letter box shape, where your zip will go.  Draw a line right through the middle of this now, which will be where you eventually cut through.


You can now place your pocket onto the lining of your bag, somewhere in the top half, leaving a bit of clearance at the top for your seam allowance and any closure, fabric wrong side up (or right sides together in other words) and sew around the letter box shape you've drawn.  Then cut through the centre line almost to the ends of the rectangle, stopping just short and cutting right into the corners.  Turn the whole pocket through the slit you've created, flatten it out on the other side and give it a press.  You should have a nice neat opening now to place your zip over and stitch in place, going around the edge of your letterbox.  Then carefully place your identically sized pocket piece over the back and sew all the way around, being careful not to catch any of your bag lining on the way!  You can now add your closure to each side of the bag lining if you wish, I've used a simple popper for this bag, and put a scrap square of lining fabric at the back to give it some extra support.  Then sew the front and back bag lining pieces together around the sides and bottom the same as you did for the outside pieces.

The next steps are the neatest way I've found to fit the lining to the bag and enclose your straps securely at the same time.  I made the straps from the same fabric as the body of the bag by the way, using the long selvage edge left over.  I made a tube out of it by folding it, sewing down the long edge and then turning it the right way round.  Then I gave it a good press and stitched along each of the long edges.  My strap is 54 inches long, which includes two inches allowance for it to go inside the seam.  So it's a really, really, super-long strap!  The bag falls in exactly the right place on my hip for me, with the bottom of the bag at fingertip length.  It also means if I ever fall into quicksand one day, I could use it to lasso a tree, and pull myself to safety.


So, place your strap ends over the side seams on the outside of your bag.  Have the raw edges lined up, and your actual strap travelling down and away from the top edge of the bag.  Make absolutely sure the strap length is not twisted.  Sew this in place about 1cm from the top edge, or just inside whatever seam allowance you've given yourself.  You can see here I've zig zagged around the main bag pieces because this material happened to be very loose weave and frayed a lot while I was working on it.


Then tuck your exterior bag inside the lining.  The important thing to remember here is that you will need to have the right sides together at this point.  Line up the raw edges and side seams and pin in place, making sure that your strap is shoved right down out of the way (it will be somewhere out of sight between the bag and lining at this point).  


Sew round the top now, but you'll want to leave around 3 inches or so open in order to turn it the right way round.  Then for the magic reveal! Pull the whole lot through your opening, turning it out so that both the bag and lining appear right way round.


At which point you'll have this.


So then you can shove the lining into the inside of the bag.  While you still have an opening in the lining, you can get in at this point to poke your bottom corners out so they are nice and pointy.


Nearly done now!  You can see how nicely your bag straps are secured inside, and they are now double stitched and sturdy - they will be triple stitched at next final step.  So all that's left to do is carefully roll the lining to the inside and press it in place, finally topstitching all the way around for a neat finish, triple securing the strap in the process, and to finally close that open seam.  I used grey thread on the top and yellow underneath.  Neat as a pin!


This will be my weekend bag for spring and I know I'll use it to bits.  It is sleek enough to be discreet, but has a nice happy lining and already goes with my new bomber (worn in the photos here), charity purchased Alberta Ferretti jacket and a gazillion other things new and old in my wardrobe.  


I love the yellow lining that shines out and the leather gives it a bit of luxe.  And the outside colour doesn't show too many marks, which is a bonus when you've got kids.  Last week I found the remains of a bacon baguette disintegrating inside one of my bags, which I now vaguely remember one bambino shoving in there "for later mummy".  This was just as we were leaving a cafe and I was distracted at the time by gathering up the little people's 47 layers of hats, coats and hoodies.  I will try to spare my shiny new bag from this sort of ambush, oooh for at least a couple of weeks anyway.


Rigel Bomber and Bag are handmade by me.