I'm still doing monochrome here at Studio 63. Last week I was looking for a black/white or grey, colour blocked type top, not too bulky in case I want to tuck in the hem, and with some drape. Topshop have some nice ones at the moment with 'unfinished' edges and frayed seams. Tempting to purchase one for a birthday tea I was going to last weekend, but I'm still feeling the pinch in my purse after Christmas so buying new clothes is frankly not an option. Fortunately making a brand new thing is absolutely, totally an option! Whoop!

This is a quick, self drafted top with a slash neck, no closures and some raw edges. I have combined a fine, drapey cotton in a monochrome abstract floral print and some black laser cut fabric (which I think is probably a synthetic mix). I'm wearing it here with lace print, black skinnies from Oasis and an old necklace (in the first shot) from New Look. The floral seemed to work well together with the black cut-out fabric helping to provide some weight to the fine floaty sleeves. I only had half a meter for each fabric and so this was a good way of using up these small pieces.

I started by folding the whole fabric length in half to give me the maximum area I had to work with. Then I arranged an existing, basic t-shaped crop top over the fabric to use as a template. Cutting around the top, giving myself plenty of seam allowance, gave me the rough shape. I then folded this in half to check that it was even on both sides and cut the neckline at this point, working outwards from the centre fold. Pattern completed! Very rough and ready!
I stay stitched the neckline at this point and neatened all the other edges with a zig zag stitch. Stitching the shoulder seams came next. Then unpicking them again to widen the neck followed! The template top I used has a little stretch in the neck band and this fabric has none at all, and is rather delicate too, so taking no chances I cut myself an extra inch here and then restitched the seam. Both front and back necklines are exactly the same as I decided not to scoop the front section any further
I cut a section of the black fabric to add to each sleeve, giving a kimono style look. After experimenting a bit with this stage, I decided to attach the black fabric so that the raw edges showed on the outside, finishing the side seams and end of the shoulder seam at this point. The sleeves are cut with the selvage edge as the hem, so no finishing at all required here.
The bottom hem is turned up double for a clean finish and the neck is just raw and slightly fraying with just one line of stay stitching. I plan to leave this unfinished, although if it seriously frays I might bind it with a slim bias strip. This top was done and dusted in just a couple of hours and I totally love it! In fact I was finishing the bottom hem just an hour or so before it made its debut outing to my friends birthday tea on Sunday afternoon.
It was very freeing to draft a design with only the feel of the fabric and a rough idea of a shape to guide me and making this top was a flashback to student days and my early years in London. I quite often started drafting up tops and skirts and sewing them together just hours before a party or club night. It's a great feeling to 'run something up' and wear it the same day. When you step out in your fabulous new threads knowing that just that morning it was merely a neatly folded pile of uncut fabric.
Make and wear in a day? Why not!
It's February and I'm already feeling spring on it's way. I'm enjoying the long (sometimes shivery) weeks of anticipation as things start to re-awaken. I'm not quite ready for short sleeves yet, it's too windy and cold for me to expose that much arm flesh even indoors! Taking these shots was a bit of an ordeal in itself (note the expression of grim determination!). But the top I made this week will be good for layering and it fits well into my current 'modus operandi' for creating very wearable but interesting garments with a focus on detail.
I started the year 2016 with my grey and black bomber, which is a good example of the theme I'm running with just now - that is clothes that have a distinct element of style and attention to detail, but can mix well with both my handmade and ready-to-wear wardrobe. I want clothes that play together nicely and can be sociable with each other.
Last year I made some fabulous stand-out pieces that I love to wear (floral trench, winter berry dress, orange lace dress) but frankly they can be scene stealers and show-boaters when asked to spend time with other clothes. Too many of these divas, and they will all start to fight with each other. Wardrobe carnage will ensue.
I chose view B taken from Simplicity K1699, which is a pattern offering a number of different garments including a jacket, trousers and a dress! That's a lot of options for one pattern. As with all 'wardrobe builder' pattern packs I did wonder about how good quality the individual garment patterns were going to be and how it would turn out. I cut a size 14 (UK size) and didn't bother with a toile.

I wanted to make this top in a plain, single colour to emphasise the fitted bodice lines and large peplum flare from the waist. Thinking this dark grey poplin fabric would provide me with some structure and provide an architectural feel to the top. I managed to find a brand new 22 inch, concealed zip straight away in my zip stash, which was perfect. Was this pure luck or is it an indication that my zip stash is now actually larger than the stock in some actual haberdashers? Anyway, using up a zip made me feel better about purchasing the poplin last week. Ok it was less than a fiver, but having been rattling on here about needing to use up stash, it did feel rather naughty bringing another carrier bag of fabric into the studio!
The seam lines on the bodice section offer plenty of opportunity to ensure the fit is good before sewing up. You can see from the photo below where the princess seams are before I pressed them.
The collar is a very satisfying to do; nicely crisp and pointy. The patterns instructions say to simply under stitch the collar to keep the edges from rolling. However I know this top is going to be chucked in the wash fairly regularly and I really want to keep those nice sharp edges. I chose to top stitch all the way around, as near to the edges as possible.
The sleeves are a doddle as they're raglan. Quick and easy.
The pattern calls for a lapped zip, but I see no reason to use one at all unless this is a look you particularly like. Either a concealed zip or even an exposed zip in a contrasting colour would be better options I think.
I fiddled around with the hem a bit trying a few things out, wondering whether to do a plain turned hem or use bias binding, perhaps in a different colour. And what turned up in my trimmings box - a length of bright yellow bias binding! Perfect to emphasise the shape of the wide peplum hem and sharpen up the whole look of the top. It's quite narrow bias, so just adds a small highlight of colour.
I think my inspiration for these colours comes from my gorgeous Carly Dodsley ceramics, sitting in my grey kitchen and currently filled with bright daffs.
And maybe also inspired from drinking lots of cups of tea from my favourite Jane Foster lion mug! Yellow and grey are a winning combination.
I'm pleasantly surprised at the top, although I haven't made anything else from this set yet. The dress is based on the same bodice pieces with the peplum continuing down to the skirt length you want, so having got this bit fitting properly I imagine the dress might also be a good future project.
You could change the feel of this garment and make this top also in a summery coloured cotton, or floral print for a softer, prettier look if that's what you're after. You could even experiment a bit with colour blocking on the bodice, sleeve sections, collar and peplum. It would actually make quite a fun scrap-buster in contrasting panels.
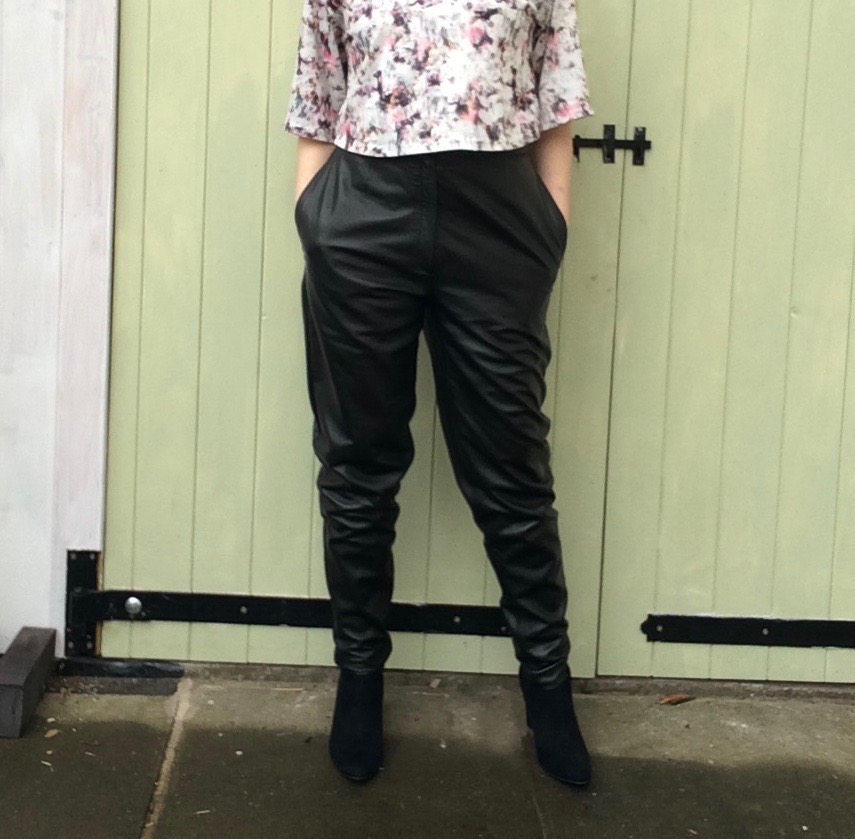
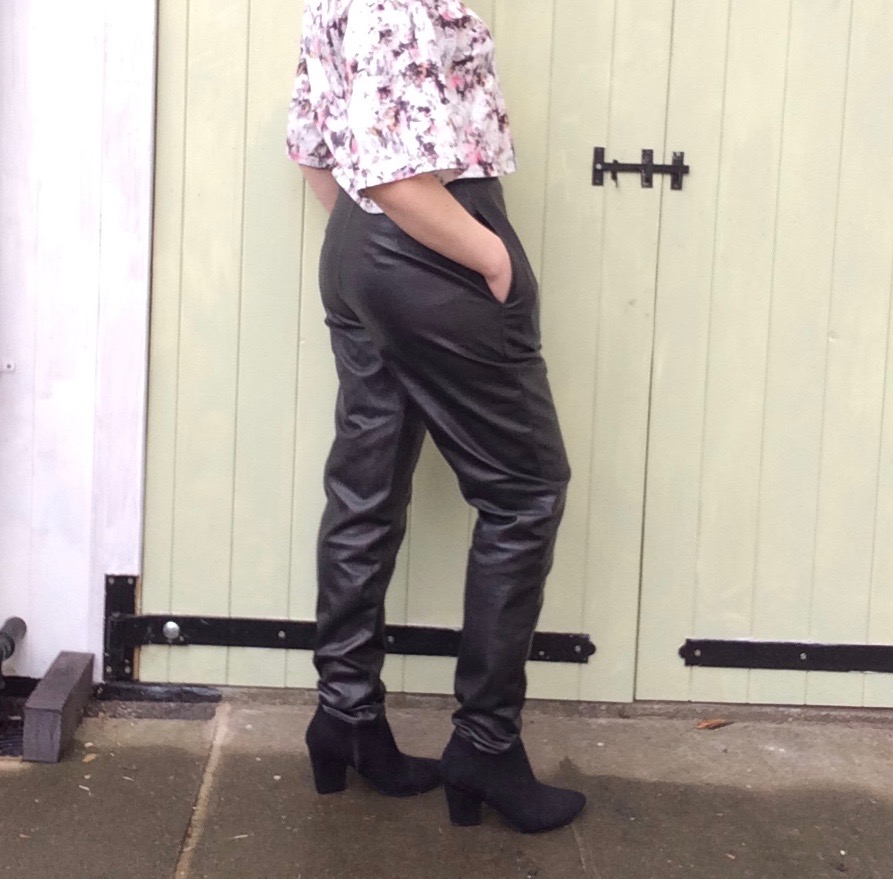
During the last couple of evenings I've finally got around to altering a pair of beautiful quality, but formerly unflattering, pair of leather trousers. I've Just got round to photographing them this afternoon and can't wait to wear them this week! Please excuse the quality of the photographs today though, it has been raining cats and dogs since this morning and in the last of the light when it has finally stopped, I found my phone camera struggling with the conditions rather. Here they are though, altered and ready to wear.

So let's go back to where they were in the wardrobe hierarchy until this week. I have about 5 pairs of leather trousers currently and wear about 3 of those regularly. I consider them to be key garments for me and I love wearing them. This is one pair though, that I've only ever worn out a couple of times but they've never really inspired much love until now. They were given to me a few years ago by a colleague, who kindly brought them in to see if I wanted them as she 'knew I was into fashion'. She told me she'd bought them many years ago from a boutique while on holiday in Italy and then never wore them, but as they'd been so expensive she hadn't wanted to get rid of them either. All the tags and labels were still attached and they'd been carefully wrapped in tissue paper. Such a shame that she didn't feel they were really 'her' after having unwisely bought them on a whim (I've soooo been there!) but what a windfall for me. The only slight problem was that they reflect a very distinctive style of a late 80's era that doesn't really translate well now, both on my body shape and in relation to my wardrobe. So after residing unworn in her wardrobe for years, they now had a new home residing unworn in mine.
Having had a good look at them, they had a few good points, as follows:
Soft, supple and look like new
Fully lined
High, cinched waist that fits me perfectly
Reasonably well fitted around the rear and crotch, (although on the generous side it's an acceptable amount of ease in relation to their style)
Interesting, relaxed cut that potentially takes them up a notch from plain leather jeans to a more stylish level
Here's what the top looks like inside out so you can see the construction. Nicely lined and a soft fitted waistband. This really is the business end of a pair of trousers and would be an extremely difficult part of the garment to refit, if not impossible without leaving alteration marks. So the fact that this area fitted well was a huge incentive to have a go at sorting out the rest of them.
They also had a few issues, which were:
Too long in the leg
No pockets - WHAT?!?
Extremely wide in the hip and thigh area
Wide along the length of the leg, which then narrower where the ankle should be... on a taller person
Wide.... just very, very wide.
Not flattering generally... bleurgh
There was a distinctive 1980's vibe about them in the high, pinched waist, the generous cut and narrower ankle, which I sort of like. However they are creeping slightly over into MC Hammer or 'muscle pants' territory and that is what is putting me off wearing them. It's basically just not a flattering look on my frame and makes me look like a short person wearing a tall person's clothes. I just don't have enough actual leg length to pull this amount of fabric off.
I decided to bite the bullet and alter them so that the fit is better, whilst trying to keep the basic design elements present. Having done a bit of leather sewing last year altering the charity shop leather skirt and then this year doing the leather inserts on my bomber jacket, I've gained confidence in working with this material and also some tips and techniques that would hopefully stand me in good stead. The shot below shows how the trousers go from narrow at the waist to balloon-like over the hips.
A major irritation with these leather pants is I really, really want pockets. It just feels very wrong to me, having relaxed slouchy trousers and nowhere to shove my hands while standing around, er... relaxing. Basic error here surely. So this is how I went about altering these louche leather lovelies.
I started by unpicking the side seams all the way to around one inch below the waistband where the pocket opening would roughly start. I used scissors and just cut through the lining material rather than unpicking it, as it was much quicker than unpicking the stitches and I knew there wouldn't be a shortage of seam allowance here. You can just see in the photo above, under my finger where the sides at the top near the waistband, the seam edges have been reinforced with tape, so it's odd that no pockets were then added here.
Trying them on inside out, I roughly held the edges of the seams together where I wanted to lose some width and marked the new line roughly with white tailors chalk onto the reverse side. When I was happy with that, I carefully marked the new line for sewing the seam with tailors chalk so that I could follow it exactly. I marked the seam at one extra inch from the the hips and gradually took this to two inches further in towards the lower leg. I was tempted to take in more, but these are supposed to be a baggy style and not skinnies or straight leg, so I resisted the temptation to pull them in further. I used the new chalked line to guide me and carefully cut outside of this line so that some BUT NOT ALL (important) of the excess width was taken away. It is crucial at this stage when cutting a bit blind that you are very conservative in your estimation of how much to lose! Better to cut a little at a time, check t e fit and the look, and then adjust again in increments. Rather than find you've merrily lopped off such a massive chunk that you now have nowhere to go. I have also learned this the hard way from cutting my children's fringes. Telling the school that your child is channelling a Paul Weller circa 2015 style fringe is fine for a few weeks, but unlike hair your leather trousers won't grow back!
Turning them the right way round again and trying them on, I could now use small bulldog clips (what I had to hand at the time, there's probably a better way of doing this bit isn't there? Do comment if you know of one!) to roughly hold them together and check the shape was looking ok from both the back and front views. As you will know, pinning isn't really an option here as the pins will permanently make holes in the leather and so really doesn't allow you to adjust along the way. The nipped in ankles needed to be wide enough to fit my foot through without stressing the leather, but narrow enough to look styled and not just hanging there, so that needed double checking too.

I took the pocket liner shape from a trouser pattern I have already used, cut from some black lightweight polyester lining, and attached them to the side seams after checking where on the hips they should sit. Sewing them together and finishing the edges was done in the usual way. You can see from the shot above that the completed pocket area does pooch out a little on either wide when I move around, but I'm not too worried about this.
I topstitched the pocket line at the front edge so that they sit nicely in place.
Then the bottom hem - a couple of options presented themselves here. I could have cut it to the length I wanted and just left it as a raw edge. I could also have turned up the hem and either glued or sewed it in place. In the end I decided to trim down a little of the length to get rid of most of the excessive crumpled look around the bottom and improve the way it hung, then turned under a little and added a dab of fabric glue. If for any reason I want to rip the hemline open again and change the length, I can and there will be hopefully no marks on the leather.
All in all I'm very happy with these now and love having a pair of leather trousers that aren't just a variation of a skinny or straight jeans cut. They're also really comfy to wear, look styled when actually I've just chucked them on with a t-shirt, and look completely different to anything I've seen available on the high street just now.
I've worn them here with a cropped top from New Look (an old purchase from around two years ago) and a pair of ankle boots from Primark. For work I'd probably dress these up a little with strappy heels and lovely silk shirt or t-shirt with lots of drape, tucked in to show off the high waist. After spending so much time sidelined, I'm so pleased these lovelies are back in circulation. Back in the game!
Here is the finished bomber jacket, completed yesterday and photographed today!
This is the second Rigel Bomber jacket I've made, from Papercut patterns, and it turned out just as good, if not better. The previous bomber I made early last year was bright yellow with a crazy oriental print but this one was intended to be more understated and wearable. In fact I think it's going to be one of the most wearable things I've made in the last couple of years. It's my perfect throw-on jacket that goes with everything from jeans to skirts and dresses. Bombers really are so versatile, there's now wonder that they appear in the high street shops re-styled for every season.
The colours are muted in charcoal grey and black, but it's the details and quality of fabric that makes this jacket special for me. The main body is a lovely silk linen mix, probably suiting material originally, that I've had in my stash for ages. I used version 2 of the Rigel pattern, which includes a geometric detail of contrasting fabric at the shoulder. I chose black leather, also from stash, to form the shoulder inserts.
The shoulder sections at each sleeve head in this version of the jacket are made up of small pieces pieces jigsawed together as a design feature. You could easily use contrasting fabric in either plain or print to compliment the main fabric. Here's what the wrong side of the shoulder sections looked like, with the converging seams coming together and joining the front and sleeve sections.
It made for some fairly thick overlapping edges, needing careful and slow sewing with a leather needle. The rib collar then had to be attached equally carefully to the leather on the neckline - no room for mistakes and unpicking with leather. I was really pleased though at how well it did come together in the end and the finished design with the top stitching looks good. You can also see here where this detail extends down to the back of the garment.

Another subtle detail that I'm very happy with are the welt pockets on either side of the front. I realised with hindsight that it was much less nerve wracking doing these on the original very highly patterned bomber, where the pockets were less obvious. With a plain, dark coloured fabric there really is nowhere to hide with these! Mistakes would be extremely noticeable and not easy to fix. They probably need a better press looking at these photo's, but the finish is pretty neat on the whole. I just used a scrap of black polyester lining for the pocket bags so that they didn't show through.

I already had plenty of the cotton ribbing needed for the collar, cuffs and waistband, purchased from plush addict and used on my previous bomber jacket. It's great quality and really soft and comes in lots of different colours. This was another no-purchase element of this garment as I was using leftovers! In fact the only things I did buy especially for this make were the open ended black zip and some black thread.

As with my previous bomber from this pattern, I chose to add a lining. Leopard print black and gold satin seemed a fitting choice to compliment such a sober exterior! There are lots of tutorials on the web now for adding a lining and I used a combination of these to make a simple version from the original pattern pieces. I cut out the back section again in the lining fabric, but inserted about an inch and half extra in the centre for ease and took a little off the neckline where the facing would be. Then I cut the fronts and sleeves (using version one sleeves) again taking off the requisite facing width from the neck edges of each (remembering to add a seam allowance back on). On all sections, I added an extra inch and a half at the bottom edge, just to be sure I had enough ease and a generous hem to hand sew in place.

Love that lining! I incorporated the facing section in this version (I didn't use it for the yellow version and just took the lining all the way across the inside fronts to the zip). You can insert piping here too if you want more detail. The lining is turned under at the bottom, zig zagged and hand sewn to the ribbing at the waist and also around the ribbing inside the wrist bands.
So there it is, my new absolute top fave thing to wear! All the way through photographing this afternoon, my dog Chester tried to get in on the action by sneaking into shot. He loves a photo-opportunity does Chester. I think he has been so used to being photographed throughout his life, that whenever he sees a camera now he marches straight into position, assumes a pose and waits for the click! I let him have his way on this one, seeing as he matches my jacket.
Happy New Year 2016 everyone! I've had a super-busy Christmas season and loved wearing some of my favourite handmade garments for the party season. I wore the berry coloured dress for a Christmas Eve family lunch out and thus christened it as my most favourite winter, me-made garment so far. Now finally we've also got some cold weather befitting of the season so the full-on winter wardrobe is well and truly required. I've actually spent the last few days repairing the pockets of my thick woollen peacoat, replacing lost buttons, and fixing a few other neglected winter garments that simply haven't been out of the closet since last winter. Having a cosy sewing studio to retreat into during the evenings has been such a treat, I'm so lucky to have the luxury of space and everything I need to hand whenever I choose. Heater on, check! Music on, check! Cuppa tea and a sneaky bite of christmas cake or choc, check! (It would normally be wine but after having quite an indulgent party season, I'm trying to give my poor liver a break this month). At the moment I have a white hyacinth in full bloom in my studio, filling the whole room with perfume and looking very spring-like. Gorgeous.

I'm straight into making another coat this year, a bomber jacket to be precise. I'd already made another version of this Papercut Patterns, Rigel Bomber once before last year, and it's been such a fun and versatile little jacket. So that's the pattern I'm plumping for again but in a totally different fabric this time and with a much more casual look. Many of the clothes I made last year were quite smart, dressy or statement pieces that stood out. This year I'm starting to think about wardrobe staples and easy going separates that still have a bit of interesting design or edge to them.

The pattern is tried and tested, already cut perfectly to my measurements and I plan to line this jacket too. As you'll know if you've come across this pattern before, it doesn't include a lining, but most people have opted to draft one. It's easy enough to cut the lining pieces using the same front, back and sleeve sections and there are lots of directions from other sewists on the webosphere to piece it together. This was the jacket I made early last year, bright golden yellow with lots of detail.
If you read that post (my very first post back here in June 2015) you'll already know that the fabric was actually a bedspread that had been given to me but hardly used. I love this crazy yellow jacket, but subtle it 'aint! So this new version is meant to be much more low key and casual. I'm aiming for something that will hopefully throw on and go with anything, including a bit of luxe but without shouting for attention.
The fabric I've got lined up is also entirely from stash (also a great start to the year given that I have an obscene amount of fabric to use up before I can justify any more new purchases in 2016) and I'm choosing a medium weight silk and linen mix. I think this large piece of fabric was a suiting remnant from a factory shop that I picked up some years ago and it's lovely quality material in charcoal grey with a subtle sheen and handles beautifully. The black cotton ribbing for waistband, cuffs and neck is left over from the previous jacket, as I bought more than I needed with the intention of using it again. I've chosen to contrast with elements of black leather at the shoulder section, using a small piece recycled from another garment. The lining will be chosen from a stash selection on standby.

I have a drawer full of leather pieces that I squirrel away as I come across them, like this one above, which has a large seam running across it but still offers a good amount of usable material. Even small pieces of leather can be used as embellishments, so it's worth keeping them whenever you wear out an old, soft leather jacket or handbag. I've even cut the tops of old pairs of boots before and used the leather for embellishing bags, making straps, button fastenings and hanging loops. The top half of long boots rarely get any wear and tear, so can usually be lopped off, stripped of their lining, and recycled into something else that requires a sturdier thickness of hide. Here's my re-used leather in its new form on my jacket. You can see where it meets the charcoal coloured main fabric at the top and bottom of this photo.

The shoulder sections of each sleeve of this bomber jacket (using Version 2 of the instructions), are made up of small pieces pieces jigsawed together as a design feature, so you could use contrasting fabric or colours here. Each piece is sewn together to make the complete shape of the shoulder. I've finger-pressed the leather seams open at the back and then carefully topstitched along both sides of the seam. All this has required a leather needle, slow and steady peddle control and some careful trimming of seams at the back to reduce bulk, especially where all the seams converge to a point. But it stands out really well and makes a nice geometric shape. The welt pockets are done too now and I'm just in the process of sewing the back and front sections together. It's at this point that I'll consider the lining.
Whilst getting back into making new things, I've also been enjoying using some of my Christmas presents to help along the way. One of the top scoring gifts this year is this meticulously well made and fantastically useful table-tidy! Made and given to me by my very clever Mum, who also knows how untidy I generally am, this has done a great job of keeping all my most used bits and pieces to hand. As well as providing a place to sweep all those stray threads, snippets of fabric and balls of fluff that would otherwise be forming little tumbleweeds across my cutting mat. Beautiful and useful at the same time. Thanks Mum!
Making my own Christmas decorations has been a bit of a tradition since we moved into our own first house about ten years ago with only a car boot full of belongings to our name. We didn't have much cash to squander on non-practicals but I did have my sewing machine and was given some tartan wool fabric to make cushions. Instead I used it to make star shapes which I strung together on gold string and hung them everywhere. Making our own decorations is also something of a family tradition, I still have some made by my mum, beautifully bugle-beaded felt shapes that hang from the tree every year. This year sees the addition of some cheeky woodland characters who live together in a festive garland.
I have made one or two of these just about every evening this week, sketching a template using inspiration from British woodland and garden animals and birds. I've tried to keep the shapes simple and exaggerate their colours and markings in each case.
The shapes are cut out of felt and hand sewn together. There is a front and back section for each animal, with a little wadding slotted in between (some leftover bump interlining from a curtain-making project in this case, but you could use a couple of extra layers of felt). I added the details such as paws, tails or other features on the front half of the animal before sandwiching it all together and sewing around the edges. Not forgetting to tuck in a loop of ribbon at the top to hang them up with.
Here's the back of the bristly badger.
Robin and fox appeared first, followed by badger, wren, thrush, owl and the little doe.
All this has been done whilst sitting on the sofa in front of the television with minimal need for concentration or application, just happy faffing around with scissors and felt and a box of trimmings. What I hadn't noticed immediately, was how mildly annoyed they all appear to be! Mr Cunningham the Fox looks as though he might be already anticipating with trepidation the boxing day hunt, the curmudgeonly badger is most definitely in a surly mood and even the red squirrel looks cross. Perhaps because he can't quite reach that tantalisingly sparkly pear.
The little eyes are all black, metallic glass beads to give twinkle. I wanted to keep the stitches visible and used a mixture of cotton thread and some thicker embroidery silk for the sewing together, I think it suggests quite well their fur or feathers. Whip stitch keeps the front and back sections together nicely but you could use blanket stitch to good effect. This little collection of creatures are very cute and very festive, nestling between the pinecones and lights in their forest garland. Even if some of them are looking a bit Bah Humbug!
Here's a sneaky look at one of my Christmas makes, which may or may not (ahem!) be a present for somebody. At the moment I'm wobbling about giving it away, as it's extremely cute and my children will snaffle it if they catch sight of him. The pattern for "Chris Moose" was inside Sew magazine recently (October edition that featured the Christmas 2015 templates) and although I don't often sew craft items or soft toys, as my house could honestly be filled to the rafters with them, the tweedy combinations of this toy appealed to me, as well as the opportunity to use up some stash fabric.
Also with Christmas approaching I am definitely much more inclined to indulge my urge to enjoy make crafty things and cute stuff, and then I can give it away.
This festive fellow is actually made out of some fabric from yet another charity shop find that made its way into my stash a few weeks ago, when the winter apparel started to appear on the rails. It was a pure wool tweed, full length skirt from Laura Ashley. Sadly a size or two too big for me and as it was supposed to be a fairly slim fitting style, it was very obviously baggy around the waist and hips even when wearing a longer top to cover the top few inches. I could have adjusted it of course, taking the waist band off, taking the seams in and perhaps adding some darts for shape. But to be honest that's not why I bought the skirt. It was purely for the beautiful dark brown herringbone wool.

The refashion/remake pile is a stash I try not to let get too big because I could end up with just a big pile of unwearable clothes that are going nowhere fast. I dislike having to alter clothes generally, I do find that unless I really see the potential for altering that will reveal a fantastic result, it tends to be dull, faffy and fiddly sewing and lowest on the priority list for me. I have been known to apply myself to altering things, if it's a piece I love and I absolutely know it will be worth doing, like the grey leather skirt I took up recently, but I normally defer to making something completely from scratch. However picking up interesting garments that are made of lovely fabric, from charity and thrift shops or table top sales, is irresistible to me. Something of quality will always come in useful to me.
Working with pure wool is a real treat I think, and just as much with little novelties like this as with a garment to wear. It is easy to work and shape, has great colour and is soft, warm and durable. Chris is sporting several different types of wool here with his red check antlers, forest-green herringbone hooves, cream check belly and toffee coloured ears all being made up of contrasting little pieces and offcuts. He has definitely got the cuddle factor, but also looks nice hanging out on the sofa in a seasonally appropriate kind of way.
His eye is tricky to see here as the enormous moosey antlers are casting a shadow over his smiley face! The weather has been so awful here lately, the dark days have made taking photographs a bit of a challenge, hence the bright kitchen lights making deep shadows inevitable. Anyway you can just make out that I've used some black silk embroidery thread in satin stitch to make his peepers, although I could just as well have used buttons, which would have been a cute addition. I've used beige thread for his mouth (slightly wonky sewing evident here, but adds character, no?) and two nostrils.

His body needs the stuffing packing pretty tight in order to stay upright and so the legs don't buckle (I used washable, polyester stuffing that is specially for soft toys but you could also used material scraps if you wanted). He holds up very sturdily then on his four legs, albeit with a rather John Wayne stance about the rear end! You need to interface the antlers so they stay rigid and don't flop around too much, but as you can see here they stay up quite well. The pattern recommends you sew the tail onto the body after stuffing and sewing up, however I chose to insert his tail into the seams between the body and gusset before sewing, as I think it looks neater.
I've finished him off with a ribbon round his neck and a little spotty bell. This is a pattern that could, with a little alteration easily become a reindeer, using grey brown colours and the changing the shape of his antlers from rounded to pointy. There's plenty more wool in the stash for a few more friends to join him!